Tips and Tricks for Staying on Top of Meeting Agendas

Attending meetings is a necessary evil of my job. Thankfully, most of my colleagues see the value of having a running agenda stored somewhere in the cloud. Over the years, I’ve come up with a few best practices of my own that have helped save me time and keep me on top of my game.

1. Use Alfred to quickly launch agendas in the cloud

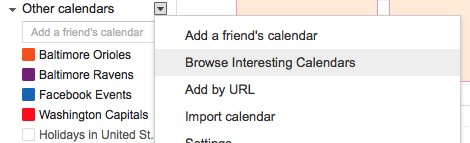
Agendas are great. Having to remember what every person decided to name the agenda just to find it isn’t. I can never quite remember if they decided to use “Catch Up”, “Running Agenda”, or “Meeting Notes”. I’ve solved the problem by making an Alfred workflow that opens the URL for the agenda by typing “agenda” followed by a descriptive keyword for the meeting that makes sense to me (e.g. agenda managers). The amount of time this saves me is honestly a bit mind-blowing.

2. Use Apple Notes or another notes app to store your own notes for the agenda

My colleages and I tend to use meeting agendas as shared notes and edit them throughout the meeting as things come up. However, I’ve started keeping my own running agenda for each meeting in Apple Notes. It’s nice to be able to look back over my own notes in one place rather than a myriad of Byword files. I’ve named all these something similar (e.g. Agenda Notes: Meeting Name) to avoid another complicated naming scenario as described in the last tip.

3. Add any action or follow up items to Omnifocus ASAP

As soon as I get back to my office, I make sure to review the agenda and my own notes making sure to capture any action items into Omnifocus for further action. This ensures nothing slips through the cracks before the next meeting.

4. Keep an agenda project in Omnifocus

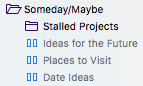
Any time I think of something I need to discuss with someone that’s not immediately pressing, I add it to Omnifocus as a reminder to mention it the next time I see them. I name each item in the same format, “Person’sName: Action”, assign it to the @People context, and add it to my Agendas project (if it’s a work colleague). If I know the next date I plan to meet with that person, I’ll set a defer date as well.

When it comes time to meet with someone, I have one of two options for reviewing items to discuss with him or her: (1) view the @People context which has items involving both work and personal contacts or (2) view the Agendas project which only has work colleagues. Since every item includes the person’s name, I can search by name to narrow down the list to a specific person if need be. If an item up for discussion seems like it will warrant a lengthy discussion, I make sure to add it to the agenda before the meeting as well.

Using Keyboard Maestro to Send Tracking Numbers to Deliveries in Airmail

I’ve been using Airmail since the day it came out, so I was ecstatic when it came to iOS. The iOS version even added a bunch of new features, and the most recent Mac update for brought most of those features to Mac as well. On iOS, one of my most used features is the ability to send emails to Deliveries to track shipping notifications via the Action List. Sadly, there is no Action List on the Mac version.

Deliveries does have a Share extension on the Mac, so you can right click the tracking number and send it to Deliveries, but in my experience, the share extension doesn’t always grab the right information. For example, capturing an Amazon order grabs the “#” before the tracking number, which prevents Deliveries from recognizing it as an Amazon order. Not only do you have to delete the symbol manually, you still have to confirm the dialog before it gets added to Deliveries – all unnecessary steps in my opinion.

Deliveries offers another way to send things to the app – forwarding them to an email address, so my first thought was to set up an IFTTT recipe to forward emails to Deliveries. I quickly realized that to capture all shipping notifications automatically, you either need to create rules to pick up all the specific types of order notifications to avoid missing any emails or create a generic rule that searched for something like shipping which caught way to many irrelevant results.

So I abandoned fully automating the process and instead turned to the trusty Keyboard Maestro which I seem to be using for everything these days. I was able to set up a hot key, only available in Airmail, that will forward the email to Deliveries and then archive the message. It works for any order type without creating multiple rules, and it reduces the number of steps required to add something to Deliveries down to one.

You can see the workflow below:2016-06-15 screenshot


Making the Case for a Single Homescreen

IMG_6251I’ve been in the two home screen camp for as long as I’ve owned an iPhone. It just made sense to have a page for my most used apps and a page of folders for all the others. In the past two years however a few things have changed:

  • Switching to an iPhone 6 meant more room for icons per screen
  • I also cut back on the number of apps I use overall.

Fewer apps and more screen real estate made for two very empty looking screens, so I started wondering if maybe I could be one of the “crazy” people with only one screen of apps. Turns out I can.

Introducing my new and improved single home screen…

Row 1: The Dashboard

Row1In the top row you’ll notice my “dashboard” apps. Fantastical provides me the hard landscape of my commitments. Day One lets me journal about my day. Momentum tracks my habits, and Fitbit tracks my health and activity.

Row 2: The Folders

row2

I initially put this row at the top, but realized moving them down creates a visual distinction between my “dashboard” row and my frequently used apps. One of the biggest game changers here was a tip from CGPGrey in episode 26 of Cortex, where he mentioned putting only the most important apps on the first page of a folder. This lets me keep apps on my phone without really having to see them on the home screen.

My Apple folder still contains all the stock apps, but I’ve been able to hide them all on subsequent pages leaving only the App Store, Phone, and Settings app.

The second folder contains all my “miscellaneous” apps. I’ve tried to arrange the apps in different pages based on their function loosely described below:

  • “Action” (e.g. Uber, Starbucks, Scanbot)
  • “Distractions” (e.g. games and less important services that I don’t want pulling at my attention)
  • “Utilities” (e.g apps that live in my Notification Center or provide other background functions like Workflow or 1Blocker)

Media contains apps like my TV show tracker, Instagram, Netflix and Youtube. CGPGrey’s tip also means I can keep apps with awesome interfaces like Tweetbot on my phone for when I need to access Twitter but keep them “hidden” to reduce the temptation of mindlessly browse feeds all day.

Remote is my last folder and contains the apps for remotely controlling various things in my life (Nest, Alexa, WeMo, etc.)

An added benefit of keeping my folders on the main home screen is that the rest of my apps listed below are now much easier to access when using my phone with one hand.

Row 3: The Content

row 3

This row is entirely based on content. Reeder for RSS Feeds (still the fastest way to go through my feeds and flag things to read later), Pocket for things I want to read later, Overcast for podcasts, and Spotify for music.

Row 4: The Reference Apps

row 4

The last row is reserved for apps I regularly refer back to: Dark Sky for weather, Notes for active lists and project notes, Waze for directions and “time to leave” reminders, and 1Password for managing passwords.

The Dock

dock

My dock contains the most important apps: Messages for chatting with people, Airmail for email: Safari for looking up things, and Omnifocus for keeping my life on track.

Also worth noting, keeping Omnifocus in the last dock slot keeps it in the same location as the “Add to Inbox” icon inside the app removing the need to move my thumb when adding a new task to Omnifocus.


My Current Omnifocus Workflow

With my project and context organization out of the way, I figured it would be helpful to explain how I’m actually using Omnifocus to get things done (or at least try to get things done).

I start every morning by reviewing my calendar in Fantastical. This gives me a good idea of where I need to be and how much time I’ll have to do things.

Next, I go through my inboxes. Email is up first. Anything that is going to require more than 2 minutes gets added to Omnifocus using the Airmail’s built-in integration. I also check my “Action” folder in Readkit which contains anything that I’ve starred in Pocket. This may be a recipe I want to add to Paprika, or something I want to research further. As with email, if it can be dealt with quickly I do, otherwise, it gets added to Omnifocus. Last but not least, I jump over to Omnifocus and process anything that’s been added to the Inbox.

While I’m in Omnifocus, I look over my Waiting perspective and the Forecast View briefly to see if there’s anything I can check off or need to attend to. With that out of the way I go to my Available perspective, which as you might guess, shows all of my available tasks. Based on what I have going on for the day, I decide if there are any tasks I want to tackle during the day and flag them.

Once tasks are flagged, I can work entirely from my custom perspectives (based primarily on where I’m at) to get things done:

  • Today shows all due or flagged tasks grouped by context and sorted by project. It’s a nice overview of everything I plan on doing sorted by where I can do it.
  • Work also shows all due or flagged tasks, but it’s grouped by project and sorted by due date so that I can tackle the most pressing issues first.
  • Home, once again, shows all due or flagged tasks grouped by project, but I sort this one by duration. By the time I get home, I’m usually pretty tired, and doing chores is usually the last thing I want to do so sorting by duration lets me check off the quick wins.
    I do have other custom perspectives like Errands and Grocery List but these are the three I primarily work from.

To stay on top of this workflow, I’ve created a Daily Routine project that lives at the very top of my Projects list. I’ve flagged the project so that every step shows up in all three perspectives, just to serve as a reminder in case I miss a step.

Revisiting Context Organization in Omnifocus

Contexts seem to be a point of contention when it comes to any GTD system. How many should you have? What should they be? How many is too many? A quick look at the countless methods being discussed in the Omnifocus Forums show that there is no single right way for picking contexts, and when you consider the possibility of a task having multiple contexts (not currently possible in Omnifocus), it gets more complicated. The age old answer of “It depends” truly applies here. That being said, a few things stand out for me when I look at those long lists of contexts that people have.

Don’t try to do too much with Contexts

In its purest form, a context is a tool or location. II need to be at home in order to clean the shower in my bathroom, so “home” is a great example of a context. No matter how much I wish it were true, there’s simply no way I could get my shower cleaned while I’m at work. The problems tend to creep in when you start to factor in other things like energy levels, time available, or urgency.

On paper it makes sense to define these various lists to drill down to what you can work on at any given moment, but if you use something as powerful as Omnifocus, there are more options available to you for this than just contexts. There are due dates and flags to indicate urgency or importance and durations to indicate quick wins or when you’re looking for something to do during a set period of time. Prefixing tasks with a “mindset” such as “READ:” or “WATCH:” can also help you define your tasks by mode as well.

Don’t think to Granularly

When I first started implementing GTD, I thought I needed an incredibly complex list of contexts. I had geo-tagged sub-contexts for each of the stores I visited, contexts for every person I regularly talked to, and even contexts for every room in my house. Much like the trend towards fewer folders when managing email, I quickly learned that the cost of managing a lot of sub-contexts can be* far greater than the benefits especially if the contexts only contain a small handful of tasks.

*Notice I said can be. Sometimes granularity does help as is the case with my Grocery Store context discussed later.

Adding a prefix to a task can also really come in handy here. Instead of having a sub-context for a friend, consider putting their name before the task (e.g. Boss’s Name: Discuss Office Layout). You can still easily drill down to all tasks involving your boss by searching his or her name, but you won’t need to worry about a lengthy list of contexts. I do this with stores now as well.

Regularly Review and Adjust

In the paper planning world, reconfiguring your system is seen as “Planner Fail”. It’s frowned upon, probably because it takes so long to recopy everything. The beauty of software like Omnifocus is that there’s no need to recopy everything over if you need to make a change. Contexts and projects can be created, removed, or rearranged just as quickly as your life changes. While I’ve distilled my contexts lists down over the years, I still regularly consider making changes. In fact, I just got rid of two contexts today that were being used sparingly.

My Contexts

  • Do – Some tasks can truly be done anywhere
  • Campus – For work or graduate school related tasks that require me to be on campus
  • Home – For things that need to be done at home
    • Arriving – This is a geotagged context to alert me of anything I need to be reminded of when getting home (e.g. bring that item that’s been sitting in my trunk in with me)
  • People – Anything I need to discuss with a person at a later date.
  • Errands – All things I need to do when I’m out and about.
    • Shopping – Anything I need to buy.
      • Grocery Store – Anything I need to buy specifically at the grocery store.
        • Sub-contexts for each aisles – Subcontexts, in this case, allow me to keep my custom grocery perspective organized based on the layout of the store I shop at. For a more detailed explanation, I wrote about it here: Creating a Smart Grocery List in Omnifocus
  • Waiting – Any tasks that are part of active projects but are waiting on something or someone else before they can be completed.

Revisiting Project Organization in Omnifocus

A lot has changed in the 2 years since I last wrote about how I organize my projects in Omnifocus. I actually had to chuckle a bit when I looked at the projects I used to have. Things look so much simpler when you compare that list with my list of projects today. Now that I’ve been using Omnifocus consistently for over two years now, and one of the biggest takeaways I’ve learned is that how you organize your projects and contexts can make or break how well perspectives can work for you. I now pay close attention to how my projects are listed so that the most important ones show up first.

2016-04-14 screenshot-2

At the very top of my projects is my Daily Routines list. This is a single action list for all the little things I want to make sure I’m doing every day to keep my life on track. This includes things like checking my calendar, flagging tasks I want to accomplish for the day, and reviewing emails. It lives at the top of my projects and stays flagged so that it shows up front and center when I’m working from my perspectives.

The next section of my project lists is my Areas of Responsibility, which haven’t really changed that much. You’ll still find Work, School, and Personal as before. However, you’ll now also find an area called Home. Turns out being a homeowner is almost a full time job in itself, so it quickly earned its own section. Again, the areas, as with everything in my projects list, are listed in order of priority so that they show up in order of importance in my perspectives.

2016-04-14 screenshot-3

Each area of responsibility is organized in a similar way – each having its own single actions list for any miscellaneous tasks followed by single action lists for sub-areas of responsiblity. These are areas like personal development for work, finance under personal, and cleaning under home. After the sub-responsibilities, you’ll find sequential or parallel projects for any current projects I’m working on.

Following the areas of responsibilities, you’ll find a single actions list for my shopping list. I’ve written a couple fairly detailed posts on how I use Omnifocus in conjunction with my recipe manager, Paprika, and my Amazon Echo along with a custom perspective to manage grocery shopping, but this list also includes anything else I need/want to buy that isn’t tied to a particular project.

2016-04-14 screenshot-4

Next up is the Someday/Maybe folder. For those of you familiar with GTD, this is self explanatory. For those of you who aren’t, anything I might want to do or haven’t committed to doing currently lives here. This also includes a sub-folder containing any stalled projects (prefixed with their area of responsibility) so that they don’t clutter up my lists of active projects. Another thing you’ll find in this folder are various lists of things to do or check out and places visit. I’d been keeping these lists in various locations over the years but recently decided they were better stored here in Omnifocus where I could regularly review them.

Last but not least, you’ll find a folder for templates. There aren’t any real changes here. I use it to hold lists for things that happen over and over again but don’t repeat on a regular basis (e.g. hiring a new employee or packing for a trip).

Note: I used to keep separate Someday/Maybe and Templates folders inside of each area of responsibility. Not only did it make my list incredibly long, it was a pain to browse through on my phone too. I consolidated these into single folders and haven’t looked back.

On TextExpander’s Recent Announcement

Yesterday morning, Smile announced some pretty big changes to one of my favorite apps, TextExpander. Like many, the minute I saw TextExpander in the headline of a post on MacStories, I was jumping for joy at the chance to buy the new version and support Smile. Sadly, my excitement was quickly quashed as I read through the changes. With version 6, TextExpander would become a subscription service.

Now, to be fair, my disappointment was not solely because of the new subscription model. While I do feel the price is a bit steep, I’d have still considered it given the sheer amount of time TextExpander has saved me over the years – over 30 hours as of writing this.

2016-04-06 screenshot

I have no qualms about paying for an app who’s features add value to my life even at a higher price. Unfortunately version 6 of TextExpander did not add value. Two features highly touted in version 6 are snippet sharing and a Windows client. Most of my friends and coworkers look at me like I have two heads when I mention any sort of automation, so sharing snippets is definitely out of the question, and given that I haven’t used or owned a PC in years, I don’t need a Windows client either. New features, as others have remarked, seem to heavily favor teams rather than individual users like myself.

What really concerns me the most, however, is the fact that my snippets would be stored on TextExpander’s servers. I’ve yet to see any details about encryption or security of their new sync service, and since TextExpander is essentially a keylogger, watching for whenever you type a snippet abbreviation, the idea of the service being online is quite frankly terrifying.

So where do we go from here? I’d hope that Smile takes their customers’ reactions seriously and reconsiders their decision. As a long time customer, I hate to see a good company like Smile suffer, but if they don’t there are plenty of alternatives ready to step up and fill the void. (Check out aTextTypinator, TypeIt4MeKeyboard Maestro, or Alfred. Heck, even OS X has the ability to expand snippets these days.)

Personally, I’ve ported all my “snippets” over to Keyboard Maestro, which I already owned and used. There wasn’t a handy import/export feature, so the process was a bit tedious, but many of my snippets are now vastly improved thanks to the added power of Keyboard Maestro. I’m still quite dissappointed to have to leave TextExpander but I think Keyboard Maestro will suit my needs just fine, and if nothing else, I have one less app to buy updates for.

A Case for Using Facebook – Finding Cool Events

When I was little, my favorite phrase must have been “I’m bored.” I used it all the time. Now I can’t even remember the last time I was bored. I always seem to have something to do, but more often than not that something to do is pretty routine. Maybe I’m not bored, but doing the same things over and over can get pretty darn monotonous so finding new and interesting things to do is important.

Now I can’t take credit for this tip entirely. It actually came from Kendra Wright in episode 83 of the Productivity Show Podcast, where she shared her Facebook “hack”. The one reason I haven’t abandoned Facebook entirely is events, and it turns out, if you take some time up front, the events feed in Facebook can be an incredibly powerful tool for finding cool things to do. Thankfully, this tip actually requires very little interaction with Facebook after the initial set up. (Another bonus given that I’m trying to reduce my time on Facebook.)

So first things first, go to your Likes page and unlike anything you don’t actually like. If you’re like me, you’ll find quite a few things you don’t even remember liking (e.g. that group about how Nickelodeon shows of the 90s were awesome), and quite a few more that you only liked because you had to (e.g. giveaway entries). Whether this actually helps in this tip is debatable, but you’ll need to be in your likes section for the next step, so you might as well clear it out while you’re there.

2016-03-31 screenshot

Go through your Likes page and subscribe to the events for your favorite places, bands, and brands. Not all of my likes had this option, but most did. Now any time your favorite restaurant, band or whatever, has an event nearby it’ll show up in your events feed along with a few other suggestions based on some Facebook algorithm. Chances are going through this process will remind you of a few other places you might want to follow too. If you’re interested in their events, follow them too. (Remember, you’re not actually committing to all these events. You’re just making a list of potential things to do.)

With your events feed pulling in a ton of cool things to do, you’re almost done with the Facebook part. The last step is to grab your events calendar feed from the Events page. It’s on the right hand side towards the bottom and looks like this:

2016-03-31 screenshot-1

I use Google Calendar as the backend for all my calendaring needs, so I subscribed to it there, but you can use whatever calendaring app you want. Most should support it. Along with the Facebook Events Calendar, I also subscribed to calendars for my favorite sports teams. Just add them by clicking Browse Interesting Calendars. For added ambiance, I set the color of the calendar to match the team colors. (Note: these are read-only calendars. Information only syncs one way – to you. You cannot change events on these calendars.)

2016-03-31 screenshot-2

Now if you use Google Calendar, you likely already know that calendars can be toggled on or off. Kendra’s workflow consists of toggling the Facebook calendar on to check for possible things to do when she does her weekly planning. When she find’s something, she copies the event to her own calendar. If you only use Google Calendar, you’re done here.

I manage my calendars through Fantastical, which lets you make “calendar sets,” to quickly toggle multiple calendars on or off. It’s the calendar sets that makes this tip even better for me. I set up a “Sports & Events” set that toggles off all calendars except for sports, birthdays, and Facebook events all at once.

2016-03-31 screenshot-5

Like Kendra, if I’m planning or just trying to find something interesting to do, I just switch to the Sports & Events set. If something catches my eye, I can right click the event and select the “Duplicate” option to automatically add that event to my own calendar, bringing over any event info with it. Admittedly, my favorite part of this workflow is that one of my last remaining reasons to visit Facebook, finding events, is gone.

Creating A Minimal Browsing Experiencing in Safari

Years ago, back when theming a Mac was possible, it wasn’t uncommon for me to spend hours tweaking the way the menu bar looked or changing the stock icons of my favorite apps. These days I’m pretty content with the way OS X looks though, which is good since Apple’s greatly reduced the ability to customize it. In any event, I’ve always done my best to hide things that didn’t need to be seen. Case in point, this screenshot from 2008 where I meticulously picked out every icon to match the wallpaper.

I’m no where near as into customizing as I used to be, but I still try to keep things as minimal as possible. Bartender’s a great example of an app that does that by keeping my menu bar tidy. I rely heavily on Bartender’s ability to only show an item in the menu bar if it detects a change. In fact thanks to that feature, on a regular basis, I only have 3 things in my menu bar: Healthier only when I’m at my desk, Fantastical, and the time (and of course the dots are Bartender itself).

03_29_16 at 01.05.01PM

Somehow Safari ended up being the next app to be caught in my minimizing grasps and the results are a Safari interface that’s as minimal as I’ve ever had it. The minimalism isn’t just for looks though. It’s actually changed my behavior, making me more mindful of my browsing and more efficient too.

Hide Unnecessary Extensions and Buttons in the Toolbar

The first thing I did to simplify Safari was to hide any uncessary extensions and buttons on the toolbar. Only the things I truly use regularly need to be in the toolbar for quick access. For me this meant things like the Pinterest button didn’t make the cut. Pinterest unfortunately doesn’t have Share extension support where I’d prefer it to be located, but I’ll share my solution in a second. 1Password, the Share extension, and downloads are the only thing occupying the right side of my toolbar these days.

Remove the Favorites Bar

The next thing I removed was the favorites bar. This was a pretty big step for me. I’ve always had the favorites bar shown in my browsers for as long as I’ve been using a computer. I was worried I’d miss it, and I did for about 20 minutes. After those 20 minutes, my muscle memory had completely switched to using Alfred to launch my most visited sites.

Configure Alfred to Launch Bookmarklets

One thing Alfred couldn’t replicate out of the box was the bookmarklets that lived in my favorites bar. Paprika, my recipe manager of choice, allows you to import recipes from websites, but it does so using a bookmarklet rather than an extension. (Maybe one day that will change.) Without access to my favorites bar, saving a recipe became a lot more complicated than a single click. Thankfully, I found a wonderful Alfred workflow that let’s you trigger a bookmarklet with a keyword. I used “paprika” as the keyword to launch Paprika’s bookmarklet purely so I didn’t need to remember something else. Now when I’m on a site, I just need to launch Alfred and start typing paprika to get the bookmarklet.

timed-03_29_16 at 01.20.49PM

With the bookmarklet solution figured out for Paprika, I used the same workflow to make one for Pinterest. Remember I removed the button from the toolbar, so I needed a way to pin things. Pinterest’s bookmarklet, available originally for the iPhone before it got it’s own dedicated share extension, is available here.

New Windows Open Blank

Rather than launch a particular page or display my favorites, I opted to have new windows launch with a blank page. Minimal yes, but it has greatly reduced the mindless visiting of certain sites that I found myself opening purely because of habit. So here you have it folks, my Safari experience.

03_29_16 at 01.40.57PM

The Mindful Browsing Extension

03_29_16 at 01.28.58PM

My last Safari tweak is actually the addition of an extension called Mindful Browsing. If I find myself visiting a distracting site, I can click a button on the toolbar to block the site. Next time I visit it, I’ll be met with a timer (set to a time of your choosing) and a message asking me to reconsider my decision. Another handy addition is the inclusion of when you last visited the site, which serves as a great reminder for how often you actually visit distracting sites.

My Digital Detox

photo-1423666639041-f56000c27a9a.jpg
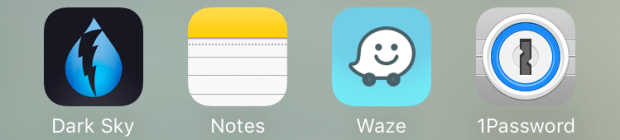
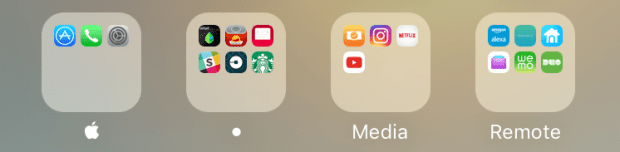
The internet is a wonderful place, but spending 40+ hours a week on it has lead me to the point of information overload. While I love consuming information, eventually it’s gotten to be too much, and I’ve had to start limiting my consumption. Much like decluttering physical clutter, reducing the constant flow of information has now become a bit of a hobby for me.

Step 1. Purge

The first thing I did was unsubscribe from things ruthlessly. If it wasn’t bringing value (or joy – Hi Marie Kondo fans) to my life, it had to go. This meant unfriending people on Facebook or at least hiding their posts, unfollowing people and companies on Twitter, and unsubcribing from subreddits and RSS feeds. I also paid careful attention to people and companies I happened to be following in more than one place.

Step 2. Eliminate Unnecessary Distraction

I removed all social media apps from my phone with the exception of Slack, which I use for work purposes, and Instagram, for sharing photos. Now I have no need to mindlessly scroll through Facebook, Twitter, or Reddit from my phone. (I’d get rid of Instagram too, but I’ve yet to find a way to post photos without the app.) If I want to check up on my accounts, I can do so on my computer and focus my time away from my computer on who I’m with and what I’m doing.

Step 3. Establish Ground Rules

Eventually I decided no amount of filtering my Facebook newsfeed would be enough to remove the negativity it was evoking. I haven’t deactivated my account as I still feel there is some merit to friends including me in events, but I have decided I won’t be checking notifications and messages regularly. My last status update pointed people to other ways they can reach or follow me that don’t involve flooding me with negativity – these are my “ground rules”:

  • If it’s important, the best way to reach me is to text me.
  • If it’s photos they want to see, there’s Instagram.
  • If it’s random tidbits of my life on the internet they enjoyed, there’s Twitter.
  • If they want to send me things to check out or see what I’m reading, there’s Pocket.
  • If all else fails, there’s email or talking to me in person.

The benefits of these rules are numerous:

  • I have fewer places to check for updates, and the places I am checking are already part of my preferred workflow.
  • The information that comes to me is more of what I actually want to see and less of what people are telling me to see.
  • I’m more mindful of what I’m doing when I’m on my phone – no mindless scrolling through content.
  • The places I’m sharing content are all public which is a great incentive to focus on sharing content that represents me as I truly want to be represented.
  • The services I continue to use all allow me to cross post to other services easily. If I want to share an Instagram photo or an article from Pocket to Twitter, I can do that easily.
  • There’s now one less service in the Share menu on my phone and computer.