Replacing Drafts with the Apple Quick Note Feature

I’ve written in the past about my keyboard shortcuts for quick entry on my Mac. At this point using ⌘+space to launch Alfred, ⌥+space for quick entry for Things, and ^+space to jot down notes have become muscle memory.

While the app has changed a few times over the years, Drafts was my app of choice for jotting notes the longest. I mean its tag line is literally, “Where text starts,” and it’s honestly great at it. But in the back of my mind, I always felt like I just wasn’t using Drafts to its full potential, and with that nagging at me, I found myself tinkering and trying to optimize the app over and over again. I set up actions and action groups, organized my workspaces, played with themes, and hid as much as I could to make the app as minimal as possible. No matter what I did, I’d find myself myself back to jotting down notes in one jumbled workspace, and when I needed to get text out of Drafts, I wasn’t using any of the actions I created. I was using MacOS’s built in Share extension, and most of the time, the app I was sharing things to was Apple Notes. Drafts was overkill for my needs and really just serving as another junk drawer for notes, and so I kept asking myself, “Why create notes in Drafts when I could just create them in Apple Notes to begin with?”

When Apple released the Quick Note feature for MacOS with Monterey, I saw this as my chance to see if I could get away with using Apple Notes and the Quick Note feature to replace Drafts entirely.

Two years later, I think it’s safe to say I can.

By default, Apple sets up Quick Note to be triggered via a hot corner, but I already use my hot corners for other things. What I really wanted was to be able to trigger it via ^+space like I was used to with Drafts. Apple doesn’t make it easy to set up a keyboard shortcut for the Quick Note feature. It’s definitely not in Apple Notes settings where it should be, but it is possible.

To set up a keyboard shortcut for it, go into System Settings > Keyboard > Keyboard Shortcuts > Mission Control. There you should find an option for Quick Note to add the shortcut of your choosing.

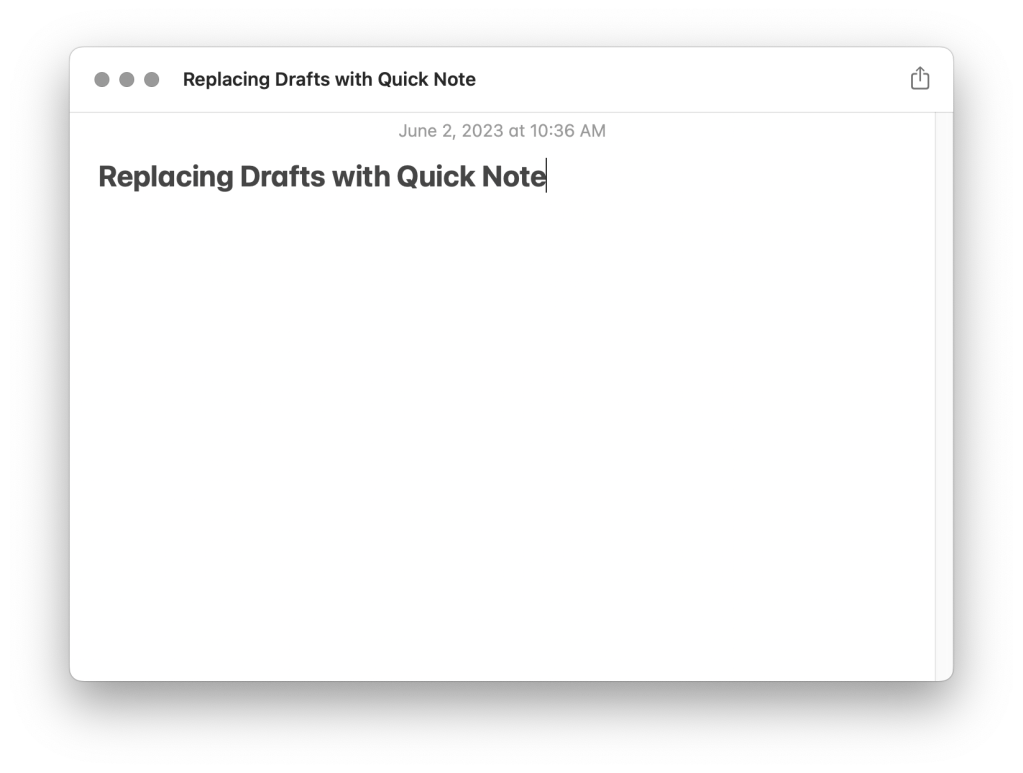
Apple’s Quick Note window turns out to be the minimal, quick note taking solution I was looking for (no pun intended). On top of that, anything I jot down gets saved into Apple Notes automatically, so I don’t need to worry about sharing it to Apple Notes. I can also share it out to other apps if I need to using the share extension, and because I already review Apple Notes every week as part of my weekly review, that’s also one less inbox I need to review every week.

Screenshot of Quick Note window

If you’ve wanted to use something like Drafts for quick text entry, but felt it was overwhelming, I highly recommend seeing if Apple Notes can fit your needs. It certainly fit the bill for me.

Linking to Apple Notes

For those of you that have followed my blog for a while, you know I’ve really wanted to use Apple Notes for my personal knowledge management for a while now. There’s really only one thing holding me back – linking. For reasons unknown to me, Apple seems to have no intention of adding linking any time soon despite it being a feature that’s present in almost every other note taking app.

Even Apple’s other apps like Mail have a way to uncover a link using AppleScript at least. If you want a link to a note in Apple Notes, on the other hand, you have to act as though you’re sharing it with someone via phone or email even if the person you’re sharing it with is just yourself. Oh, and then it adds a wonderful Shared section to Notes to remind you of all the notes you’ve shared with yourself.

My frustration eventually lead me down a rabbit hole that lead to this post – a [very convoluted] way to generate a link to a note without sharing it.

Allow me to introduce how I link to notes in Apple Notes using Keyboard Maestro and Shortcuts.

The Starting Point – Opening an Apple Note with a Shortcut

Theoretically, if you only link to a few notes, you could just create dedicated shortcuts for each note you want to link to and then link to the shortcut using the format shortcuts://run-shortcut?name=Shortcut%20Name. If that sounds good enough for you, you can swap out Clipboard for the actual note title in the following shortcut and call it a day. I, however, like to link to a lot of notes, and I really didn’t want to have to create a new shortcut anytime I wanted to link to a new note.

(By the way, links to everything are included. You’re welcome.)

I started by creating a generic “Open Note” shortcut that opens a note based on your clipboard. This is a simple two-step shortcut:

  • Find All Notes where Name contains Clipboard
  • Show Notes

Adding On – Generating a URL Base to Launch the Open Note Shortcut

Like Shortcuts, Keyboard Maestro can launch automations via URL, but it has one super power over Shortcuts’ URLs – the ability to pass a value through a URL. This means we can use it as a common URL base to run the shortcut above for any note just by changing the URL.

The macro is as follows:

  • Set System Clipboard to Text “TriggerValue”
  • Execute Shortcut “Open Note”

Almost There – Generating the actual Note Link

Now, honestly, at this point we have the base URL, and you could just manually create the links at this point. For example, “kmtrigger://macro=Open%20Apple%20Note&value=Work%20Ideas” would open my Work Ideas note.

But I don’t do clunky, and typing things out particularly when they involve percent encoding multiple words is one of my least favorite things to do. Thankfully we don’t have to, and for this I give you two options:

Option 1: Keyboard Maestro

I set this up using Keyboard Maestro initially because I’m more familiar with it, and because I already did the legwork, I’m including it here. For those of you who want a universal option, feel free to skip ahead to option 2 which uses Shortcuts instead meaning it will work on Mac OS, iPad OS and iOS.

Using Keyboard Maestro I set up a second macro that works only when I’m in Apple Notes, so that when I press ⌘K it copies the note title I’ve selected and generates the URL for me.

  • Triggered by any of the following (when Notes is at the front)
    • This hot key: ⌘K is pressed
  • Will execute:
    • Copy Selected Text
    • Filter System Clipboard with Percent Encode for URL to variable Note Title
    • Set System Clipboard text to “kmtrigger://macro=Open%20Apple%20Note&value=%Variable%Note Title%”

Now I can generate a link to any Apple Note that can be pasted anywhere on my Mac. If you only ever use a Mac, cool, you’re done, but I suspect most of you are like me and use iPhones and iPads.

Keep reading.

Option 2: Shortcuts

We can do the same thing in Shortcuts using a shortcut that receives text input from the share sheet that percent encodes the selected title, appends it to the base URL, and adds it all back to the clipboard, just like the Keyboard Maestro version, but Shortcuts means unlike the other option, this one will work on Macs, iPhones, and iPads.

Side note: If you want to use it on MacOS, you need to check a box to have this enabled in the services menu and optionally via a keyboard shortcut by going to the Details pane.

One More Thing – Parsing a Keyboard Maestro Link

Now we have our links, but we still need to use them. Again, if we’re just using a Mac with Keyboard Maestro, we’re fine using the links as they are. We’re out of luck if we want to use them on our iPhones or iPads though, which brings us to our last and final piece of the puzzle.

This is simply a shortcut that works in reverse of what we did earlier. Select the URL and select share from the pop up menu. It grabs the selected URL, removes the base Keyboard Maestro URL, percent decodes the URL, and then opens the note with that title.

So in summary here’s everything.

  1. Open a Note using Shortcuts
  2. Generate the base URL using Keyboard Maestro
  3. Generate the unique note URL using Shortcuts or Keyboard Maestro (Mac only)
  4. Open the Link on an iOS/iPad OS Device

I’ve only been testing this for a bit, and admittedly my brain is fairly exhausted after putting all this together. I also will never claim to be an expert in Shortcuts or Keyboard Maestro, so there is probably a way more elegant way to do this. I’m open to suggestions. In testing, I’ve only run into a few issues in terms of notes having similar titles or content. In that case, Shortcuts graciously gives you the option to pick the note you want from the results.

Hopefully that helps some of you. I’m off to give my brain a sorely needed break. Happy note taking.
State of Notetaking 2020 Edition

Long time readers may know I’ve dabbled here and there with other platforms for my personal knowledge management such as Apple Notes, Agenda, and DevonThink. Time after time, though, I always seem to Evernote.

The reason for my dabbling was due to a feeling of uneasiness when using Evernote. For years, I’ve been increasingly less and less confident in the Evernote’s future or the company’s values, but in the absence of no better alternative, I stuck around hoping the tides would turn.

Suffice to say, the tides haven’t turned, and their recent app updates removed several of my most used features. Sure, Evernote keeps saying that they’ll bring these features back in the future, but this is also the same Evernote who said the new versions would be better than ever. Spoiler alert: They’re not.

One thing that has changed, however, is the world of Evernote competitors. It’s hard to say there are no better alternatives anymore, especially now that my needs have simplified, which is why I started thinking about what I truly needed out of a personal knowledge management system.

Topping the list of must-need features:

  • I need to be able to save important emails easily for reference.
  • I need to be able to add multiple file types.
  • I need to be able to link to notes both within and outside of the system.

My obvious first choice would have been Apple Notes, which I’m already using for sharing notes with my other half. Unfortunately, while it does meet most of my needs, it doesn’t have any sort of integration with my email app. Note links are also quite clunky. You pretty much have to pretend to share the note with someone to get a note link.

The highly-praised Notion was next on my list, but quite honestly I don’t have the patience to set up a database from scratch.

I also tried OneNote, but, my gosh, the interface is “oh-so-Microsoft Office” and seemed way too fiddly for my needs. No thank you.

At this point, I’ve settled with Bear. I’m still getting used to the tag-based structure, but overall, I’ve been liking it a lot more than I expected. This is in part to the simplification of my organizational needs from when I last tried it. There are a few things I do miss, like tables, but those seem to be on the road map so hopefully, the wait won’t be too terribly long. It’s also worth mentioning that Bear’s Pro subscription is around 20% of what a year of Evernote Premium would cost me.

With that said, I really do hope the best for Evernote. As a note-taking service, it’s still a pretty great option for most users, I’m just not sure I’m most users anymore. If they can prove me wrong, I’m still keeping my options open, but for now Bear seems to be my best bet.

My Current State of Notetaking

image

A number of people have been asking what notetaking system I’m using lately. I’ve written about it in passing like when I explained why I was no longer using DevonThink or why I didn’t renew my Agenda subscription, but I wanted to give a more concrete answer.

First things first, I’m back to primarily using Evernote for my notes and have been for quite some time.

I say primarily, because I’m still using Apple Notes for things I need to share with my other half. There’s just no way I’d be able to get him to become an Evernote user, whereas he was already using Notes on his own when I met him. (Props to him!)

If Apple decides to add more to Apple Notes down the road, I’m certainly interested in switching back to Apple Notes, but right now that list of features to add is pretty significant:

  • Tagging
  • Saved Searches
  • Note Links (Apple Notes has this, but I pretend I’m sharing a note with someone to get the link.)
  • Integration with my email client, Spark
  • A better web clipper – Evernote’s web clipper is simply miles ahead of Apple’s share extension.

With that out of the way, I also wanted to quickly update how I’m structuring Evernote because it’s changed since I last posted about my set up.

I’m still very much a fan of Tiago Forte’s P.A.R.A. system. However, my current notebook structure is much more reminiscent of my set up in other applications like Things, making it easier to mentally switch between systems.

Instead of stacks for Projects, Areas, Resources, I now have a stacks for each of the main area of my life: this blog, Home, Personal, and Work. Then, within each of those stacks, I have my notebooks for my active projects, areas, and resources.

I do still maintain an Archive stack, and within it, I have a notebook for each of the areas mentioned above. (As with before, as projects are archived, I’ll tag all the notes with the name of the project and move them into their respective area’s archive notebook.) The main reason I kept my Archive notebooks separate from my area stacks is because I do have a few areas (like my Undergraduate and Graduate School notes) that are no longer active with content I still wanted to hold on to.

Photo by JESHOOTS.COM on Unsplash

Notes – My New Version of Planner Fail

delano-balten-348814-unsplash.jpg

When I first started this blog years ago, I wrote mainly about paper planners. I was a bit obsessive about my Filofax(es) and switched up my “system” just about every week. For anyone in that community, planner fail isn’t uncommon. In fact, Filofaxes almost encourage the behavior, but when I went digital, I thought my days of planner fail were behind me.

Then, a few weeks ago, I wrote about how thrilled I was to abandon Evernote and consolidate all my notes into Apple Notes. Well, it took me about 2 weeks to realize that probably wasn’t the smartest move after all. As much as I thought I’d like having my notes all in one place, in practice, it actually frustrated me.

Now I will say, none of this was a fault of Apple Notes. Apple Notes is surprisingly powerful and handled everything I threw at it. My frustration was due more to how my brain works than software limitations.

Apple Notes originally won me over with its simplicity, but once you add a few hundred notes, it turns out Apple Notes or any system for that matter stops being so simple. Having everything in Apple Notes forced me to accept that I actually prefer having some sort of distinction between my active notes and reference notes.

And this is where planner-fail returns… but as notes fail.

I didn’t go running back to Evernote. I’ve actually enjoyed my time without the green elephant and even turned off my subscription. I also didn’t abandon Apple Notes – at least not entirely. Apple Notes continues to be the home for “active” notes that I access regularly – my heavily-used collection of carryout menus, jotting down quick notes, and things like the list of things to do that I share with my boyfriend.

The rest of my notes, the reference and project-based notes, all now live in…

drumroll

DEVONthink Pro Office!

As a self-proclaimed Mac Power User, the move to DEVONthink has been a long time coming. I’d just been avoiding the learning curve and let’s be honest the price (although the education discount helped!).

While I still don’t care for the dated interface (which I hear may be getting a facelift in the future), there are a number of things I do enjoy.

  1. I get to pick where my data is stored – and it doesn’t belong to Evernote. I have 3 separate databases. My personal database is synced via iCloud. My other two databases, Work and School, are synced via my university’s Box cloud storage.
  2. Getting data into DEVONthink is about as easy as it was with Evernote (and much easier than Apple Notes). DEVONthink’s browser extension does what I need it to for archiving websites, and I can archive emails from Airmail directly to DEVONthink as well (although they’re plain text – Airmail team, if you’re listening, you could do better!). Airmail had no integration with Apple Notes
  3. I can search my notes with Alfred. Alfred couldn’t search Apple Notes which forced me to use Spotlight.
  4. I get to use my favorite apps. Plenty of apps integrate with Evernote and Apple Notes as far as saving things into them, but once something is saved, you’re limited to editing a note within the Evernote or Apple Notes apps. With DEVONthink, I can use the Open with Feature and edit saved files within my favorite apps. (I’m writing this post in FoldingText, but it’s actually stored in DEVONthink.)
  5. Artificial Intelligence – This is a feature I didn’t really think much of when I bought it. It sounded cool, but I figured it’d be a gimmick like Evernote’s, context feature. My main motivation for having a central place to store notes was to hopefully be able to find connections between things I’m storing, and DEVONthink’s AI feature does this automatically! Looking at my book notes for Yuval Harari’s Sapiens, I also get suggestions for notes I’ve taken on his other book, Homo Deus. It even makes suggestions for books I would have never even made connections to like Daniel Quinn’s Ishmael or Mihaly Csikszentmihalyi’s Flow. This is a game changer (and it may be enough of a game changer to sway me into continuing on for my Ph.D.).

DEVONthink isn’t perfect. I’ve had to make a few changes to adapt to its interface and storage methods, but I’m pretty confident that DEVONthink is here to stay as part of my tool bag of pro apps.

Lastly, if you’re on the fence about DevonThink or were like me and downloaded the trial a handful of times only to delete the app out of overwhelm, I highly recommend reading Take Control of Getting Started with DEVONthink 2.

Photo by Delano Balten on Unsplash

An Experiment: Migrating from Evernote to Apple Notes

IMG_B3A6CE032CBD-1

The other day I got a crazy idea to migrate everything in Evernote over to Apple Notes.

Why you might ask?

Having my shared notes in Apple Notes while everything else lived in Evernote really bugged me – probably more than it reasonably should have, but such is my life.

The other issue nagging at me was having to pay for Evernote Premium. To be honest, I wouldn’t mind paying for the service if it weren’t for their 2 device sync limit seeming like a total cash grab. Also, I’m already paying for the iCloud storage so why not use it.

Making the switch was a bit time-consuming, but I really didn’t have to give up as much as I thought I would. In fact, in some cases, Apple Notes has actually turned out to be better.

What I’m Liking:

  • Sharing Things to Notes – It’s no surprise that Apple has baked ways to add things to Notes into just about every part of MacOS and iOS, with one notable exception which I’ll discuss a bit later.
  • Sharing Notes with Others – Sure Evernote allows you to share notes, but none of my friends or family use Evernote, so the feature was lost on me, and a big reason I was stuck using Apple Notes.
  • Simplicity of Design – I really started to notice the feature bloat of Evernote. (Evernote, if you’re listening, please let users with only one account hide the account switcher in the sidebar.) Apple Notes brings me back to a much more minimal design.06_20_18 at 12.11.23PM
  • Folder Hierarchy – I don’t need crazy folder structures for my notes, but Evernote’s insistence on a two-level hierarchy forced me to adopt some weird workarounds including prefixing my notebooks and using tags as a way to add additional levels. As long as you’re adding folders from a Mac, Apple doesn’t seem to care how many levels you want to have.
  • Apple Pencil Support – Evernote claims to have Apple Pencil support but it’s horribly laggy and a real pain to use. As a result, I was already using other apps, including Apple Notes to do any sort of Apple Pencil work.

What I’m Missing:

  • Searching Notes – You’d think searching notes stored in the stock notes app would be easy for a Mac, and if you use Spotlight, it is. Unfortunately, I use Alfred, and for whatever reason, Apple has chosen to store notes in a database that seems to be ever changing preventing any Alfred workflows from keeping up. For now, I’m searching my notes using Spotlight, which means remembering a separate keyboard shortcut. (The fact that Apple’s storing these notes in a database could also be a real pain if I ever need to get my notes out of Apple Notes, but I’m going to choose not to think about that right now because Evernote’s no better.)
  • Evernote’s Web Clipper – It’s really hard to come anywhere close to Evernote’s Web Clipper. Apple Notes can only save links to websites not a full page unless you do a web archive or save it as a PDF which requires a few additional steps. That being said, I was noticing Evernote’s Web Clipper had been doing some odd things to some of my clipped websites, so maybe not all is lost.
  • Note Links – I like to include links to other notes in my notes, as well as within Omnifocus tasks and projects. With Apple Notes, you can’t actually get a link to a note unless you pretend to share the note with someone.
  • Saving Email Content – My mail client of choice, Airmail, has native support for sharing content to Evernote, but surprisingly not Apple Notes. I frequently save important emails for reference, so this is one of my most frustrating features to lose. Surprisingly, Apple’s own Mail apps also lack any ability to share to Notes.
  • Tags – I didn’t use tags extensively in Evernote, but they were helpful in grouping things by topic without having to create a full-blown notebook. For now, I’m dealing with this by sub-folders, but I hope Apple considers adding tags in the future.

There are a few scripts and tools to help you migrate from Evernote to Apple Notes, but I opted to migrate most of my notes manually unless they were purely text-based, which meant this was a pretty time-consuming experiment. (Thankfully, it seems to be a successful experiment.) I’m nearly done migrating the last of my Grad School notes, but already I’m feeling a lot better having one single place for all of my notes.

SaveSaveSaveSaveSaveSaveSaveSaveSaveSaveSaveSaveSaveSaveSaveSaveSaveSave

An Update on Notetaking with iOS and MacOS

dose-media-337491
Image Courtesy of  Dose Media

Now that classes are back in session, I’ve had a few weeks to fully test out my notetaking set up. While a number of things worked well, others needed definitely needed work. I realized quite quickly that the multi-app notetaking lifestyle did not work for me.

Evernote

2048x2048bbEvernote has become the backbone of my personal knowledge management system.

I’m really not a fan of Evernote device limits, so I’ve tried incredibly hard to avoid using it over the years, but I recently caved and bought a premium subscription (thanks to an educational discount). The ability to easily add and tag any type of information is something other apps, like DevonThink or Bear, haven’t been able to match.

Anything I think I might need to recall later like important emails, meeting notes, interesting articles, screenshots of error messages, and common troubleshooting steps all end up in Evernote. I also keep any annotated PDFs and notes from classes or quotes from books I’ve read here.

Noteshelf

2048x2048bbEvernote falls incredibly short when it comes to taking notes with the Apple Pencil. Writing or annotating within the app is laggy and requires more mode switching than I’m willing to put up with.

I’ve ditched GoodNotes, Notability, and MyScript Nebo all in favor of Noteshelf due to its ability to sync directly with Evernote. Its organizational structure is very similar to GoodNotes and offers a writing experience similar to what I enjoyed in Notability. It also offers the ability to draw perfectly geometrical shapes which was one of my main reasons for using Nebo. I found Nebo’s handwriting to text conversion more of a really cool gimmick than actually useful in practice.

My one gripe with Noteshelf is its lack of support for iCloud Drive, which is my primary cloud storage for any active projects. For now, this means an added step of needing to use the share sheet within the Files app to add any PDFs rather than using the built-in import feature. Hopefully, they’ll add it in the future.

Annotating PDFs and Taking Notes in Class

For class, I’m using Noteshelf in conjunction with Evernote.

Before class, I import the PDF copy of the assigned article and annotate as I read. During class, I use split screen to continue marking up the article we’re discussing on one side of the screen in Noteshelf while taking any text notes in Evernote. After class, I add the annotated article (synced to Evernote) to the text note created in Evernote so that everything’s stored in one place.

Interviewing Employees

I’m also using Noteshelf for employee interviews. Like GoodNotes, Noteshelf allows me to have a single notebook for a round of hiring. The system my university is using for on-campus jobs allows me to receive a single PDF booklet of resumes for every round of hiring. Prior to the interview, I insert a template page for taking notes behind the resume. Once the round of hiring has finished, I export the entire notebook containing resumes and interview notes to Box for archival purposes.

Apple Notes

2048x2048bbWhile Evernote is my primary location for storing any sort of reference material, I’m still using Apple Notes for things I need to quickly access such as carryout menus, wishlists, and other lists I’ve shared with friends and family.

In all honesty, if Apple adds tagging and a more robust organizational system, I’ll have a hard time sticking with Evernote, but for now, this is the combination that seems to work best for all my needs.

SaveSaveSaveSaveSaveSaveSaveSaveSaveSaveSaveSaveSaveSaveSaveSaveSaveSaveSaveSave

SaveSaveSaveSaveSaveSaveSaveSave

Some Thoughts on Notetaking on the iPad Pro

Update: An Update on Notetaking with iOS and MacOS

Despite being an Apple fangirl of sorts, I haven’t owned an iPad since the iPad 3 (also known as the “new iPad”, the first iPad with Retina, or as I remember it, the dreadfully underpowered iPad). I was never a huge fan of it, found trouble justifying its use, and ended up selling it when I moved.

A few weeks ago, I became the proud owner of a 10.5 inch iPad Pro courtesy of my job (Space Grey, 256GB, Wi-fi, if you’re curious). I suppose running the tech demo space on campus has its perks. Much to my surprise, I’m loving it. In fact, when running to meetings, I’m finding myself reaching for the iPad Pro and leaving my Macbook Pro in my office.

One of the first workflows the iPad Pro challenged me to reevaluate was notetaking. The Apple Pencil gave me a way to take handwritten notes digitally, and as someone who makes every effort to go paperless, I jumped at the chance. I tend to prefer handwritten notes in a number of circumstances throughout my day:

  • Planning out my day
  • Meetings
  • Interviewing new employees
  • In Class
  • General notes and doodles

After trying a number of apps, hoping to stumble upon the perfect one, I’ve come to the conclusion that one app may not be the way to go in cases like these.

Day Planning

For planning my day, I prefer Notability. While the majority of my planning is done through Google Calendar and Omnifocus, I still do appreciate having a detailed list of everything I need to do in a day to check off as I go. Only important things are in Omnifocus, and until manual sorting is added, the list is often out of order from when I actually plan to do it. Notability provides the best format for writing out my day, Bullet Journal style, and I prefer the Subject/Divider with individual notes organization.

Meetings

I actually gave up handwritten notes in meetings. I think part of me prefers the privacy of typing on a propped up screen as opposed to scribbling on my screen laying flat on a table for everyone to see. For this, I’m using a split screen set up with the shared meeting agenda in Google Docs on the right and my personal meeting notes stored in Evernote on the right. (You read that right, I’m using Evernote. More on that in a later post).

Interviewing Employees

This was the scenario that drew me to the iPad Pro. Several times a year, I have to hire a number of students to work in my office. Such is life when your employee pool is based on a group that leaves every 4 years. My prior workflow involved printing out resumes which I’d review and annotate. Candidates that made the cut are invited to an interview. Before each interview, I’d print out a checklist that I’d take notes on as the interview progressed.

For this workflow, Goodnotes was perfect. Unlike Notability, notes are organized into Notebooks with actual pages. Goodnotes allows me to have a single notebook for a round of hiring. Another feature that makes Goodnotes the winner is that I can set the page template to be the interview checklist. Instead of printing a new checklist for every candidate, I just swipe to a new page now.

In Class

While I’m not in a class at the moment, I can see Goodnotes being my pick for taking notes in my classes too. The ability to annotate articles and store handwritten notes side seems best suited to this app. Classes also lend themselves to Goodnotes’ notebook format nicely as well.

General Notes and Doodles

For simple notes, I’m finding myself using Apple Notes. Apple Notes doesn’t offer as many ways to customize the writing style, it does offer a nice feature of being available from the lock screen. In iOS 11, a simple tap to the lockscreen with the Apple Pencil opens up a new note. This is perfect for jotting down something quick.

(Tip: In Settings > Notes, you can tell Apple Notes to display lines or grids when writing handwritten notes instead of just a blank canvas.)

Honorable mention:

There’s one app that I don’t use all that often, but it’s so darn cool I’ve not managed to remove it from my iPad just yet, and that’s Nebo. In terms of organizing notes, Nebo’s structure is a lot like Notability, but it has a few tricks up it’s sleeve. Scratching through something you’ve written erases it (like crossing it out on paper, but better) Drawing lines between letters or words separates or joins them.

And then there’s there are the features that are just magical. Double-tapping on handwritten text with your finger converts it to text. This also works with diagrams and mathematical equations. In the past, I’ve spent hours on my Mac crafting professional looking diagrams and flow charts to explain workflows to my colleagues. With Nebo, the process takes minutes.

Do you have any tips or tricks for notetaking on your iPad Pro? Another app mention? I’d love to hear your thoughts on what you’re using.

Update: An Update on Notetaking with iOS and MacOS

Use Apple Notes to Tame Your Stash of Carryout Menus

I was never really a big note taker, and I could never wrap my head around why people were so in love with apps like Evernote. So when Apple announced they were revamping Apple Notes, I wasn’t all that impressed. Then something curious happened, I found a use case that changed how I think of notes entirely – Menus

I’m one of those people who likes to figure out what I’m going to order at a restaurant ahead of time and I’m usually the one calling in food orders, so I’m always looking up menus. If I go somewhere enough times, chances are I probably have the menu saved somewhere and it turns out Apple Notes is actually perfect for this.

Menus Are Always Available

Gone are the days of having a folder of menus stashed in the kitchen. I don’t need to be home or at my computer to access them stored in a folder (physical or digital). Someone can suggest one of our favorite restaurants while we’re out driving, and within seconds, I can bring up the menu from my phone. They even came in handy one day AT a restaurant that was particularly busy due to an event. The servers were incredibly busy, and I was able to bring up the menu and had everyone’s order ready for the server before she even came over with the menus.

Make Notes about Menu Items

One of my favorite places to go is a local sushi place. Their menu is massive, so I’ve started jotting down notes about what I’ve tried, or might want to try. Now I don’t have to guess which items I’ve already tried and which ones I love.

Easy Ordering

I’m usually ordering food for other people, so Notes makes it easy to jot down what everyone wants. I also have the phone number listed in the note, so once everyone’s responded, I can easily call the restaurant.

Storing menus is by far my favorite use of Apple Notes, and being able to pull up a menu and place an order in minutes has saved so much time. I now understand why people like taking notes, and I’m excited to find new use cases, especially with the upcoming addition of sharing.


Tips and Tricks for Staying on Top of Meeting Agendas

Attending meetings is a necessary evil of my job. Thankfully, most of my colleagues see the value of having a running agenda stored somewhere in the cloud. Over the years, I’ve come up with a few best practices of my own that have helped save me time and keep me on top of my game.

1. Use Alfred to quickly launch agendas in the cloud

Agendas are great. Having to remember what every person decided to name the agenda just to find it isn’t. I can never quite remember if they decided to use “Catch Up”, “Running Agenda”, or “Meeting Notes”. I’ve solved the problem by making an Alfred workflow that opens the URL for the agenda by typing “agenda” followed by a descriptive keyword for the meeting that makes sense to me (e.g. agenda managers). The amount of time this saves me is honestly a bit mind-blowing.

2. Use Apple Notes or another notes app to store your own notes for the agenda

My colleages and I tend to use meeting agendas as shared notes and edit them throughout the meeting as things come up. However, I’ve started keeping my own running agenda for each meeting in Apple Notes. It’s nice to be able to look back over my own notes in one place rather than a myriad of Byword files. I’ve named all these something similar (e.g. Agenda Notes: Meeting Name) to avoid another complicated naming scenario as described in the last tip.

3. Add any action or follow up items to Omnifocus ASAP

As soon as I get back to my office, I make sure to review the agenda and my own notes making sure to capture any action items into Omnifocus for further action. This ensures nothing slips through the cracks before the next meeting.

4. Keep an agenda project in Omnifocus

Any time I think of something I need to discuss with someone that’s not immediately pressing, I add it to Omnifocus as a reminder to mention it the next time I see them. I name each item in the same format, “Person’sName: Action”, assign it to the @People context, and add it to my Agendas project (if it’s a work colleague). If I know the next date I plan to meet with that person, I’ll set a defer date as well.

When it comes time to meet with someone, I have one of two options for reviewing items to discuss with him or her: (1) view the @People context which has items involving both work and personal contacts or (2) view the Agendas project which only has work colleagues. Since every item includes the person’s name, I can search by name to narrow down the list to a specific person if need be. If an item up for discussion seems like it will warrant a lengthy discussion, I make sure to add it to the agenda before the meeting as well.